Showing posts with label Monday Munchies. Show all posts

Monday, December 30, 2013

Monday Munchies - Party Time

Although party season is winding down, many people have some type of New Year's Eve gathering ahead of them tomorrow.  For as long as I can remember, we have always hung out with our next door neighbors on New Year's eve. Neither of our families liked to stay out late and it's my least favorite day of the year to drive anywhere once it gets late, so hanging out with the neighbors seems like the perfect evening!  We always have enough food for an army, but it's a great excuse to try new recipes and then swap leftovers.

So far, here's our contribution to this year's lineup.  Check out these recipes and let me know what recipes you're wanting to try in 2014!

Monday, December 16, 2013

Monday Munchies - Snowballs

Christmas baking has officially started!  These little cookies are known by a bunch of names and Russian Teacakes are the official (cookbook assigned) title, but I think snowballs are the most fitting for this time of year.  My mom and I made a batch of these last night, and although I always forget about them, they're one of my favorite Christmas treats.  They melt in your mouth, and I love the nutty flavor (without a chunky texture) and that the actual cookie isn't too sweet (until they're rolled in powdered sugar)! So, if you need something else to add to your holiday baking list, give these a try!


I love cooking from actual old cookbooks where you can see how they've been worn and splattered on throughout the years, so I just took a picture of the recipe today.


Recipe Source: Vintage Betty Crocker Cookbook

Monday, December 9, 2013

Monday Munchies - Easy Chocolate (Non)Dipped Pretzels

Once again, I was MIA on the blog last week.  I had friends in town, then made the 16 hour trek once again from Jackson to St. Joseph, but hopefully I'll give you guys a picture update soon.  In the meantime, check out this quick and simple recipe for a tasty and cute holiday snack!  I've made these several times for different events, and they taste just like chocolate dipped pretzels, but without the mess and hassle of dipping and drying (really, how do people get them to not have a flat side?!?), and I love that these are more colorful!


Chocolate (Non)Dipped Pretzels
1 bag of square pretzels
Candy coating (chocolate, white chocolate, colorful, basically whatever you want!  I've also seen Hershey's kisses and hugs used!)
1 bag M&Ms

Directions:
Preheat oven to 200 degrees. Line a baking sheet with parchment paper or a Silpat (unashamed author's plug - buy one...or two, it will become a favorite kitchen item), and place a single layer of pretzels on the baking sheet.  Put one piece of candy coating on each pretzel.  Bake for 4-5 minutes or until candy coating is soft but NOT melted.  Remove from oven, then working quickly, press an M&M down into the center of each piece of candy coating. Cool in the refrigerator until chocolate has set and store in an airtight container.

Monday, November 25, 2013

Monday Munchies - Pie

Can you believe Thanksgiving is this week?  It seems like this month flew by!  In case you need some pie recipes, check out these three.  There's a classic Pecan pie, a slight twist on Apple Pie with the addition of whipping cream, and a midwest favorite, Platte County Pie (or Derby Pie) which is sort of a chocolate pecan pie.  

Check out the recipe for pie crust here.


Pecan Pie
Yield: 6-8 servings


1 1/2 cups pecan pieces
3 large eggs
1 cup sugar
3/4 cup light or dark corn syrup
2 tablespoons melted butter
2 teaspoons vanilla extract
1/2 teaspoon salt

1 unbaked pie crust (9 inches)

Directions: 
Spread pecans in a single layer on a baking sheet. Bake at 350° for 8 to 10 minutes or until toasted.

Stir together eggs and next 5 ingredients; stir in pecans (I used whole pecans and just put a few in the filling, and arranged the rest on top of the pie). Pour filling into pie shell.
Bake at 350° for 55 minutes or until set, shielding pie with aluminum foil after 20 minutes to prevent excessive browning (They're not joking...I didn't set a timer and when I went to put the foil on mine were already too brown). Serve warm or cold.


Apple Cream Pie
Yield: 6-8 servings.

4 cups sliced peeled tart apples
1 unbaked pie shell (9 inches)
1 cup sugar
3 tablespoons all-purpose flour
1 cup heavy whipping cream
1 t. ground cinnamon
1/4 t. nutmeg
1 beaten egg
1 t. vanilla
1/8 t. salt
3/4 cup coarsely chopped pecans

Directions: 
Place apples in pie shell. Combine everything but the pecans and mix until well blended, then pour over apples. Sprinkle with chopped pecans.
Bake at 450° for 10 minutes. Reduce heat to 350°; bake 35-40 minutes longer or until center is almost set and apples are tender. Cover edges with foil during the last 15 minutes to prevent overbrowning, if necessary. Cool on a wire rack. Serve warm or cold. (Note: The consensus in our house was that the pie actually tasted better the second day, a great one to make the day before and save yourself some last minute prep!)

Platte County Pie
Yield: 6-8 servings 

3 eggs
1 cup sugar
1/2 cup flour
1/4 pound butter
1 t. vanilla
1 c. chopped pecans
1 c. chocolate chips
1 unbaked pie shell (9 in.)

Directions:
Beat eggs thoroughly.  Add sugar and flour to eggs and beat again.  Melt butter and allow to set 4-5 min.  Add melted and cooled butter to above mixture.  Mix well.  Pour into unbaked pie shell and bake in a preheated 325 degree oven for 1 hour.  Serve warm or at room temperature, topped with whipped cream.

Monday, November 18, 2013

Monday Munchies - Accidental Turkey

So today, I'm giving you a recipe for the hero of the thanksgiving dinner menu - Mr. Turkey!  Now, I have a confession to make...I've actually never made this recipe.  However, before you quit reading, my roommate made it for a summer thanksgiving meal (cause one thanksgiving a year really isn't enough), and it was some of the best turkey I had ever eaten.  Roasting it at such a high temperature for an hour makes the skin nice and crispy, which I love!  And the spice blend is absolutely delicious, the lemon zest and rosemary just make it!  So, if you're looking for something new to adorn your thanksgiving table this year, give this turkey recipe a try!


Accidental Turkey
Kosher salt
1 T. minced fresh rosemary leaves
Grated  zest of 1 lemon
1 (12-14 pound) fresh turkey
1 large yellow onion, unpeeled and cut into eighths
1 lemon, quartered
8 sprigs fresh thyme
4 T (1/2 stick) unsalted butter, melted
Freshly ground black pepper

Directions:
Two or three days before you plan to roast the turkey, combine 3 tablespoons salt, the rosemary, and lemon zest.  Wash the turkey inside and out, drain it well, and pat it dry with paper towels.  Sprinkle 1 T of the salt mixture in the cavity of the turkey and rub the rest on the skin, including under the wings and legs.  Place the turkey in a shallow dish to catch any drips and wrap the whole dish tightly with plastic wrap.  Refrigerate for one or two days.  The day before you plan to roast the turkey, remove the plastic wrap and leave it in the fridge.  The skin will dry out and turn a little translucent.

Preheat the oven to 450 degrees.  Be sure your oven is very clean!

Place the onion, lemon, and thyme in the cavity.  Tie the legs together with kitchen string and tie the wings close to the body.  Brush the turkey with the butter and sprinkle it with salt and pepper.

Roast the turkey for 45 minutes, placing it in the oven legs first.  Lower the temperature to 325 degrees and roast it for about another hour, or until 165 degrees for the breast and 180 degrees in the thigh on an instant read thermometer.  Remove from the oven, cover the turkey tightly with aluminum foil, and allow it to rest for 20 to 30 minutes.  Carve and serve with the pan juices.

Recipe Source: Barefoot Contessa Foolproof Recipes You Can Trust

Monday, November 11, 2013

Monday Munchies - Party Potatoes

So, this is my first post in a series of Thanksgiving inspired recipes. Thanksgiving is my favorite holiday.  I love spending time with my family and just the time I spend leading up to it dwelling on the Lord's blessings and the fact that I can thank Him for absolutely everything in my life, because I know that He is using it for my good and ultimately for His glory, what a comforting thought!

But back to the food...on Thanksgiving day, the last thing I want is to feel the pressure of not being able to enjoy the Thanksgiving day gathering because I'm trying to get food ready at the last minute.  These potatoes are super tasty and can be prepped early then frozen.  Just take them out in the morning on the day before your thanksgiving meal, and when you're ready, stick them in either the oven or a crock pot and don't think about them again!  Trust me, I'm a (self-proclaimed) potato expert, and although these are easy and you can freeze them, the taste is not compromised, AT ALL! These are probably my favorite mashed potatoes ever.  It's like the inside of a twice baked potato, need I say more?!?  Also, you have my permission to put them in a foil pan or use crock pot liners for easy clean up.  I may not be the most experienced entertainer, but I have learned that sometimes convenience is worth being able to enjoy your guests rather than spending time with your hands in the dishwater.  Also, I apologize for not having a picture, but they look like mashed potatoes.  Use your imagination, then make them and see for yourself!

Party Potatoes

8-10 medium/large potatoes, peeled

1 (8 oz) brick of cream cheese
1 c. sour cream
Garlic salt
Pepper

Bring a large pot of lightly salted water to a boil. Cook potatoes in boiling water until tender. Drain, and transfer to a large mixing bowl. Mash until smooth. Stir in remaining ingredients and beat until light and fluffy.  Put the potatoes in once the dish is buttered.  Freeze.

When ready to bake, put pats of butter and paprika on top and bake at 350 degrees till nicely browned on top and heated all the way through.

Optional - you can add green onions, chives, parsley, bacon bits, cheddar cheese, basically anything you would put in a twice baked potato.

Monday, October 14, 2013

Monday Munchies - Buster Bar Cupcakes

I've mentioned before that for each of my friends' birthdays, I like to fix them a dessert of their choice. Last year I had a little party for my friend Aaron and when I asked if he knew what he wanted for his birthday dessert, he didn't even have to think about it.  He started raving about this buster bar dessert his mom used to make him and how it was one of his favorites and said he wanted that.  Now, I know better than to try to make mama's dessert, cause it's just never going to be the same, so I decided to tweak it and make him buster bar cupcakes instead!  These are so easy and everyone loved them!  The only thing to keep in mind is that you have to wait for different parts of the dessert to cool or freeze before moving on to the next step, so make sure to allow time for them to fully set!  Also, I think these would be awesome to try with some different flavor combinations.  Ever since I made them last year I've thought how good coffee ice cream with chocolate covered espresso beans would be on top.  What flavor combinations would you like to try?


Buster Bar Cupcakes
24 foil cupcake liners
1 batch of your favorite brownie batter (don't worry, no one will judge if it's a Betty Crocker boxed mix)
1/2 gallon mint chip ice cream (or any other flavor you want) 
Spanish Peanuts (I didn't really measure these out, just sprinkle however many you want on top of the cupcakes)
Chocolate ganache (or a jar of chocolate fudge would work as well)

Directions:
Line two muffin tins with the foil cupcake liners.  Mix up the brownie batter and drop 1 - 1.5 T. into each cupcake liner.  Bake at 350 degrees for 6-8 minutes or until the brownies are cooked through.  Let the brownies cool to room temp, then put them in the freezer (still in the muffin tins) for 30 minutes.  When you put the brownies in the freezer, take the ice cream out and put it into your fridge to soften.  And set a timer so you don't forget your ice cream and end up with ice cream soup!

Take the muffin tins out of the freezer and place a scoop of ice cream into each foil liner on top of the brownie.  Squish it down and spread it evenly with a spoon.  Do this step as quickly as possible and return to the freezer for 15 minutes.  After 15 minutes, take the cupcakes back out and sprinkle some of the peanuts on top, then return to freezer for another 45 minutes.  If you're making ganache instead of using canned hot fudge, now is a great time to get that started.

Once the cupcakes are firm, take them out of the freezer and top with a heaping teaspoonful of ganache or hot fudge, you want enough to mostly cover the peanuts.  You may need to use a spoon to spread it evenly over the top of the cupcake.  When finished, put the cupcakes back into the freezer until ready to serve.

These are best if they are removed from the freezer about 5 minutes before serving.  It lets them soften the perfect amount before they are devoured!

And if you're interested, here's the chocolate ganache recipe I used:

3/4 cup mini semisweet chocolate chips or chunks
1/4 cup heavy cream

Put chocolate chips in a small bowl. Bring cream to a simmer in a small heavy saucepan. Pour cream evenly over chocolate. Let stand for one minute to soften, then stir until smooth. Ganache will continue to thicken as it stands, so just wait until it's the desired thickness, and stir occasionally while waiting.

Monday, October 7, 2013

Monday Munchies - All Things Apple

We went to the apple orchard a couple of weeks ago, and since then much of the cooking in our house has revolved around apples - applesauce, apple butter (grilled cheese with apple butter...seriously, you have to try it), and apple pie.  Well, since many of you also probably have apples hanging around your house, here are a couple apple recipes and a couple of dip recipes from the Monday Munchies archives.

Last Minute Apple Cinnamon Oatmeal

Pumpkin Apple Muffins

Crock Pot Caramel Dip

Chocolate Chip Fruit Dip

What are your favorite apple recipes?

Monday, September 30, 2013

Monday Munchies - Oatmeal Banana Breakfast Muffins

You might have noticed that it's been 8 months since my last post.  I'm not a consistent blogger, and I'm not really sorry about it.  I've actually written some posts over the past several months, but prayed about them and didn't feel like publishing any of them.

I've spent some time contemplating what the purpose of this blog is, and although it may change, right now I think that the purpose varies with the type of post.  I share recipes because people know I like food and cooking, and they ask me about what I've been making.  I share updates on life for my family and friends who care what I'm up to, because I'm terrible about keeping up with people.  Any spiritual posts are probably more for my benefit than to share with others.  Although I journal, it's helpful for me to work through things by writing it out, knowing that someone else may read it.  Making sure it makes sense to someone else sometimes makes things clearer in my own mind, so blogging is a way that I can challenge myself to more clearly communicate things I'm thinking about, praying about, questions I'm asking, and observations I've made.  By sharing it publicly, I hope that the Lord will use it to bring himself glory and if any of you are encouraged or challenged by what I write, know that it's the Lord and not my words; He alone is worthy of our praise!

That being said, Monday Munchies is back in action (well, this week anyway)!  I found this recipe one night and decided to make them in the morning.  My alarm went off in the morning and I went upstairs to find my mom cooking biscuits and gravy...which kind of made me mad, because in my 27 years of life I don't think my mom has ever made biscuits and gravy, plus I had specifically told her that I was going to make these muffins for breakfast.  Then all of the sudden I opened my eyes and realized I was still in bed!  I'm home for a couple of weeks, and because my old room is now Marshall's room, I'm sleeping in the basement guest room which has no windows.  Now, don't take this as complaining...I love the guest room because it's so dark I sleep like a LOG every night!  Also, I've had weird dreams pretty much every night.  But anyway, because my mom was NOT making biscuits and gravy, I whipped up a batch of these and everyone in the fam liked them.  Marshall kept asking for "more muffin man please" haha, adorable!!!


Oatmeal Banana Breakfast Muffins
Yield: Supposedly 12 - mine made 16
2.5 c. old fashioned oats
1 c. plain or vanilla yogurt (Greek or regular)
2 eggs
3/4 cup sugar
1.5 t. baking powder
1/2 t. baking soda
2 ripe bananas
1 c. chocolate chips (optional)

Directions:  Preheat oven to 400 degrees. Spray muffin tins with non-stick cooking spray or use paper/foil liners. Put oats in blender and grind until they are powdery.  Add all the other ingredients, including bananas in a blender (or food processor), and blend until smooth.

Divide batter among cupcake liners, and bake for 15-20 minutes, or until toothpick comes out clean.

Use all the self-control you have to let them cool so they don't stick to the tins/liners, then enjoy!  I found a little smear of peanut butter and a glass of milk to be the perfect complement, and next time I may even try adding some peanut butter to the batter!

Recipe Source: Slightly adapted from Well Traveled Wife

Monday, October 22, 2012

Monday Munchies - Pumpkin Apple Muffins


You should probably know that this recipe changed my life.  I know it sounds a bit dramatic, but it's true.  You see, there were MANY years of my life that I thought I didn't like pumpkin...about 24 years in fact!  Every year I would try a bite of someone's pumpkin pie at thanksgiving and never liked it.  But then one year I tried these pumpkin apple muffins, and they were good.  Only a hint of pumpkin, but it was alright.  So then I tried some other pumpkin things and liked them all, and realized that maybe the only way I didn't care for pumpkin was in pumpkin pie.  These muffins really are great though, but fair warning, they make a huge batch, I got 24 out of the recipe this time.  I put a dozen in the freezer, gave a few to a friend, and we still had plenty to chow down on!  The combination of pumpkin and apple make these a perfect compliment to many fall meals (and they make a pretty good breakfast too)!

Pumpkin Apple Muffins
2.5 c. flour
2 c. sugar
1 T. pumpkin pie spice
1 t. baking soda
1/2 t. salt
2 eggs (lightly beaten)
1 c. pumpkin
1/2 c. oil (I want to try this with applesauce sometime, if anybody tries it let me know how it turns out!)
2 c. peeled, finely chopped apples

Streusel Topping:
4 T. flour
1/2 c. sugar
1 t. cinnamon
4 T. butter

Directions:  Combine dry ingredients  In a medium bowl combine eggs, pumpkin and oil.  Add liquid ingredients to dry ingredients; stir just until moistened.  Stir in apples.  Spoon batter into greased or paper lined muffin cups, about 3/4 full.

For the streusel topping, mix together flour, sugar and cinnamon.  Cut in butter until mixture is crumbly.

Sprinkle streusel topping over batter.  Bake at 350 degrees for 35-40 minutes or until done.

Recipe Source: Carey Hughes

Friday, October 19, 2012

Crock Pot Caramel Dip


So Monday came and went and I completely forgot about Monday Munchies, like didn't think about it even one split second during the day forgot.  I didn't think about it during the day on Tuesday either, because I was SO excited that when the clouds lifted from the rain we had the past couple of days there was SNOW on the peaks of the mountains, and even covered some of the bowls.  That means we're one step closer to ski season, yay!


Tuesday night I went with a couple friends to a Flannel Attractions (don't you love the band names out here?!?) show at a new restaurant in town, then fell right into my bed when I got home.  Then Wednesday I thought about it, but I had lunch with a friend, picked up another friend from the airport and had small group that night.  After I got back I considered posting, but then I couldn't find my camera, and posts aren't nearly as good without pictures.  So yesterday I searched, found my camera, uploaded pics and now it's Friday!  This dip is super easy to make, delicious, and a great way to make a healthy food (apple slices) completely unhealthy haha!  Enjoy!


Crock Pot Caramel Dip
1/2 cup butter
1/2 cup light corn syrup
1 cup brown sugar
1 can sweetened condensed milk

Directions:  Mix all ingredients together in a crock pot.  Cook on low, stirring occasionally, for 3 hours or until thick and bubbly around the edges. (I cooked mine on high for about an hour instead of being patient and cooking it on low.  I also made a double batch and keep it in a jar in the fridge so that I have it on hand when we have people over.  Just nuke it in the microwave for awhile and you have an easy snack or dessert!)

Recipe Source: Farming on Faith

Monday, October 8, 2012

Monday Munchies - Last Minute Apple Cinnamon Oatmeal


Every year my parents have this thing of not wanting to turn on our heat until the latest date we can stand it, (you know, when we start wearing parkas in the house and our nose hairs freeze...ok so maybe we don't go that far!) and instead, just heating with our wood burning fireplace.  I LOVE fires so I always begged them to wait even longer, and now that I'm making the heat call myself, I've decided to postpone kicking our radiators up and just using our gas fireplace to heat things up.  It got cold in Jackson this week, and as I drug myself out of my warm bed each morning I began thinking of what I could add to my oatmeal so that I wasn't having the same breakfast everyday!  I've seen several recipes for baked oatmeal, and I need to try it sometime, but usually I walk into the kitchen about 15 minutes before I have to start working, and haven't planned ahead, so I need something that's quick.  I have several staple oatmeal combinations in my breakfast repertoire, but this week's addition of "baked" apples and cinnamon turned out to be one of my favorites, and I'm sure it will continue to make weekly appearances on my breakfast menu.  It truly captures the flavors of fall and as an added bonus, your kitchen will start the day out smelling like cinnamon-apple goodness!

Last Minute Apple Cinnamon Oatmeal
Yield: 1 Serving
1/2 c. uncooked oatmeal (Snoqualmie Falls Lodge is hands down, the BEST OATMEAL EVER.  Buy some, you won't be disappointed!)
3/4 c. water
1 small apple, grated or cut into small pieces
1 T. brown sugar
1 t. cinnamon
Optional:
1 T. chopped pecans
Craisins
Extra cinnamon
Milk or Apple Cider

Directions:
Put apples in a microwave safe bowl, sprinkle with brown sugar and cinnamon.  Microwave for 2-3 minutes or until apples are soft.  Be careful not to overcook.  In another bowl add oatmeal and water, and microwave for 3 minutes or until oatmeal is done.  Mix apples into the oatmeal, and top with pecans, craisins and extra cinnamon.  Add milk or apple cider until the desired consistency is reached.

Recipe Source: Endless Frontier Original

Monday, October 1, 2012

Monday Munchies - Pumpkin Snickerdoodles


Can you believe it's October already?  And the first happened to fall on a Monday, perfect for kicking off a month of fall recipes!  The weather in Jackson has been absolutely beautiful, highs around 70 and cool nights...perfect shorts/sweatshirt weather which has been my favorite clothing combination since I was a little kid haha!  Although I can't wait for the snow to come, I have definitely been enjoying fall in Jackson and it has me in the mood to make all sorts of pumpkin, apple, and soup recipes!  A couple of weeks ago we had a ladies' night where we all brought food and played games.  I knew right away I wanted to bring these pumpkin snickerdoodles.  The pumpkin in the batter makes them turn out so moist and fluffy, the girls all loved them!

Pumpkin Snickerdoodles
Yields 3-4 dozen
Cookies:
3¾ cups all-purpose flour
1½ tsp. baking powder
½ tsp. salt
½ tsp. ground cinnamon
¼ tsp. ground nutmeg
1 cup (2 sticks) unsalted butter, at room temperature
1 cup granulated sugar
½ cup light brown sugar
¾ cup pumpkin puree
1 large egg
2 tsp. vanilla extract

Coating:
½ cup granulated sugar
1 tsp. ground cinnamon
½ tsp. ground ginger
dash of allspice

Directions:
In a medium bowl, combine the flour, baking powder, salt, cinnamon, and nutmeg. Whisk to blend and set aside. In the bowl of an electric mixer, beat together the butter and sugars on medium-high speed until light and fluffy, 2-3 minutes. Blend in the pumpkin puree. Beat in the egg and vanilla until incorporated. With the mixer on low speed add in the dry ingredients and mix just until incorporated. Cover and chill the dough for at least 1 hour.


Preheat the oven to 350˚ F. Line baking sheets with silicone baking mats or parchment paper. Combine the sugar and spices for the coating in a bowl and mix to blend. Scoop the dough (about 2½ tablespoons) and roll into a ball. Coat the dough ball in the sugar-spice mixture and place on the prepared baking sheet. Repeat with the remaining dough to fill the sheets, spacing the dough balls 2-3 inches apart. Dip the bottom of a flat, heavy-bottomed drinking glass in water, then in the sugar-spice mixture, and use the bottom to flatten the dough balls slightly. Re-coat the bottom of the glass in the sugar-spice mixture as needed.


Bake the cookies for 10-12 minutes, or until just set and baked through. Let cool on the baking sheets about 5 minutes, then transfer to a wire rack to cool completely. Repeat with the remaining dough. Store in an airtight container.


Recipe Source: Annie's Eats

Tuesday, September 25, 2012

Monday Munchies - Southwestern Quinoa with Veggies and Mango

After getting back from Colorado Springs at 2:00 AM yesterday morning, with a full day of work and church ahead, I decided Monday Munchies was going to wait to make it's appearance until Tuesday.  We had a great road trip and the fall colors were at their peak which made the scenic routes that we took even more beautiful.  I'm resisting the urge to post fall recipes until October, but I'll share a couple of pictures from our trip with you to get you in the mood!
Just outside of town
Steamboat Springs
About an hour outside of Estes Park
But while summer veggies are still readily available, take advantage of it and make this recipe for a yummy and healthy salad or main course.  I actually have a confession to make about this recipe...I didn't measure out my lime juice and the first day it was REALLY limey tasting.  Like, pucker you up almost inedible (is that a word?).  However, I decided to squirt a tablespoon or so of ranch dressing on it, which masked the lime juice just as I hoped, and gave it kind of a nice creamy texture. If you wanted something simpler I think this would also be good to swap the dressing from this recipe with southwestern ranch for a creamier salad.


Southwestern Quinoa with Veggies and Mango
1 c. quinoa, rinsed and drained
1 t. ground cumin
1 c. frozen or canned corn (drained)
1 c. black beans
1 tomato, diced
1 small zucchini, chopped
1 small cucumber, chopped
1 small red bell pepper, chopped
1/4 c. red onion, diced
1 small mango, chopped
1 small jalapeno pepper, deseeded and finely diced
1/2 c. chopped fresh cilantro
1/3 c. lime juice
1/3 c. olive oil
2 garlic cloves, minced
1/2 t. ground cumin
1/2 t. chili powder
1/4 t. ground turmeric

Directions:
In a saucepan, bring 2 cups water to a boil; add quinoa and cumin. Cover, reduce heat to medium-low and simmer until liquid is absorbed, about 12 minutes. Remove pan from heat and let stand for 5 minutes. Uncover, fluff with a fork and let cool for at least 10 minutes.

Mix together quinoa, corn, beans, tomato, zucchini, cucumber, bell pepper, onion, mango, jalapeno, and cilantro in a large bowl.

Whisk together lime juice, olive oil, garlic, cumin, chili powder and turmeric in a small bowl.  Drizzle over quinoa mixture and toss to coat.  Refrigerate for at least 1 hour.

Monday, September 17, 2012

Monday Munchies - Put the Lime in the Coconut Cake

I have a friend in Jackson, her name is Lauren.  If we are facebook friends, you might recognize Lauren from being my Reno road trip buddy.  We had such a great time on that adventure, that we are leaving for road trip 2.0 this weekend.  This time around, we're headed to the beautiful city of Colorado Springs, with a detour through Rocky Mountain National Park in the process!  


Lauren had a birthday a few weeks ago, and on each of my friends' birthdays I let them pick out whatever dessert they want and I make it for them.  It's always fun to see what people choose, and how that reflects their personalities.  Lauren and I are a lot alike in many ways, and our love of food and baking/cooking is one of them (oh man, her strawberry rhubarb pie is DELICIOUS).  I was excited to see what she would pick, because I knew it would be something new and different.  She thought about it for awhile and then remembered seeing a Food Network show where they made a coconut lime cake, but had never made it and decided that's what she wanted for her birthday dessert.  I looked up the Food Network recipe, but when I started reading reviews I wasn't impressed.  Some people said that the cake was dry, some said it took forever to cook, the lime glaze didn't have a strong enough lime flavor, etc.  So, I decided to come up with my own recipe for the cake and combine elements from other cakes that sounded good.  If I were in MO (where I seem to have left my baking confidence) I probably would have made the cake from scratch.  However, altitude baking still scares me a little, and knowing that I was going to give this to Lauren without first trying it, (and not having time to bake another cake if the first one didn't turn out) I decided to use a white cake mix for the base.  I like to do most things from scratch, but sometimes you just have to suck it up and realize that a mix may be your best option, and this recipe was one of those times.  Lauren said the cake was great and it got rave reviews from several of her co-workers.  So, if you need a new cake recipe, try this one out (and I think it would make great cupcakes as well)!  It seems like there are several steps but it really didn't take me long at all.  I started by making the lime curd and then while it was chilling in the fridge, I mixed up and baked the cake.  After the cake had cooled I split the layers and mixed up the frosting, then put the layers together, frosted, and chilled overnight.


Put the Lime in the Coconut Cake
The Lime Curd:
3 eggs
3/4 c. sugar
1/4 c. freshly squeezed lime juice
4 T. unsalted butter, cut into pieces

Directions:
In a non-reactive saucepan, combine the eggs and sugar. Whisk together until well blended. Whisk in the key lime juice. Place the pan over medium-low heat. Cook, stirring or whisking constantly, until the mixture is warmed through. Be careful not to heat the mixture too quickly to avoid curdling the eggs. Whisk in the butter a little bit at a time, stirring in each addition until completely incorporated before adding more. Continue to cook, scraping the bottom of the pan, until the mixture thickens and a spoon or spatula leaves a path when drawn through it (no higher than 175˚ F on an instant-read thermometer.) Immediately remove the pan from the heat and pass the mixture through a fine mesh strainer. Transfer to an airtight container and refrigerate. (This keeps up to 2 weeks in the refrigerator.)

The Cake:
1 pkg. white cake mix
1 (3.4 oz) package coconut cream instant pudding
3 egg whites
1 c. coconut milk (I used the silk brand, but you could used canned too)
1/3 c. vegetable oil

Directions: 
Preheat oven to 350°F. Grease and flour two 9-inch round cake pans.  Combine cake mix, pudding mix, egg whites, water and oil in large bowl. Beat at low speed with electric mixer until moistened. Beat at medium speed for 2 minutes. Divide equally into pans.  Bake at 350°F for 32 to 37 minutes or until toothpick inserted in center comes out clean. Cool following package directions.

The Frosting:
4 egg whites
1 1/3 cups sugar
1/2 cup light corn syrup
1/4 tsp. salt
1 tsp vanilla extract
1 cup sweetened shredded coconut

Directions:
In the bowl of an electric mixer, using a handheld whisk, beat together the egg whites, sugar, corn syrup and salt just until combined, about 30 seconds. Place the bowl over but not touching simmering water in a saucepan and whisk until the sugar dissolves and the mixture is hot, 2 to 3 minutes.

Set the bowl on the mixer fitted with the whisk attachment and beat on medium speed for 3 minutes. Add the vanilla and beat until the outside of the bowl is cool and stiff peaks form 5 to 7 minutes more. Using a rubber spatula, fold in the coconut just until incorporated.

Assembly:
To assemble the cake, I split the cake into 4 layers but you could certainly go with two or even bake it in a 9x13 or as cupcakes.  To split the layers, start by measuring the halfway point of your layers and sticking toothpicks every inch or two into the cake at the halfway mark, until you have toothpicks all the way around the cake and it looks like a weird looking sun.  


Then take a serrated knife, and cut slowly around the circumference of the cake, using the toothpicks as a guide.  


Once the cake has been cut through, tape a piece of waxed paper to the blade of the knife and slowly pull the knife through the cake until the waxed paper is out the other side of the cake, then simply lift the waxed paper to separate the layers.


Put the first layer cut side up onto your cake plate.  Top with half of the lime curd.  


Place the second layer cut side up onto the lime curd and top with frosting. Place the third layer cut side up on top of the frosting and top that layer with the remaining lime curd.  Then place the forth layer cut side up on the lime curd, and cover that layer as well as the sides of the cake with icing.  Chill overnight.


Recipe Sources:  Lime Curd from Annie's Eats and Frosting from Williams-Sonoma

Monday, August 27, 2012

Monday Munchies - Flower Pot Dessert

It's been awhile since I've posted, mainly because I can't even remember the last time I cooked (aside from cooking on the camp stove).  I've had almost two weeks straight of fun adventures and this week isn't slowing down at all.  I'm taking today and tomorrow to do housework (my room looks like a gear store exploded all over the floor) and run errands (like returning the library book I finished 6 weeks ago but have renewed twice since being finished with it, and washing my car that has a solid 1/4" of dust covering it after yesterday's outing to Granite Hot Springs).  Then the rest of the week is filled up with a birthday party, improv show, and bike-in movie on Wednesday night, picking a friend up at the airport and dancing Thursday night, going out on the boat Friday, the rodeo Saturday, and a trip to see the Bar J wranglers on Sunday!  I love that there's so much going on in Jackson and will try to recap some of the last couple of weeks when things slow down again, but in the meantime, I'm pulling a recipe out of the archives!

Two summers ago I started discipling a couple of girls.  We met one night every week to go through A Young Woman After God's Own Heart.  I had seen this idea on The Pioneer Woman's food blog, and  I knew that both of the girls loved ice cream so it seemed like the perfect occasion to fix a couple of these up.  They are really easy and turn out adorable, perfect for a time when you need a quick dessert that's a little dressed up!
Flower Pot Ice Cream Dessert
1 whole Pound Cake (Since I was only making two I just bought some frozen pound cake and used two slices of it, but feel free to make your own!)
1 gallon Ice Cream (I used cookies and cream)
1 package Oreo Cookies
1 package Gummy Worms (optional)
Small Flower Pots
Straws
Fresh Cut or Artificial Flowers

Directions:
Slice the pound cake into 1 to 1 ½ inch slices. Next, with a biscuit cutter or cookie cutter that fits the bottom of the flower pot cut the slices into rounds (the scraps would be great to use in a trifle).

Into each of your (washed and dried) flowerpots, drop a round of pound cake, lightly pressing to make sure they are all the way down (this keeps the melting ice cream from running out of the hole). Hold a straw up against the side of a flowerpot and snip it so it’s about ½ to 1 inch shorter than the top. Then, just use that as a guide to cut the rest of the straws. Stick each straw into the center of each pot, anchoring it into the cake.

Grab whatever flavor ice cream you’d like to use, and either set it out on the counter to soften it OR nuke it for 20 seconds or so. It needs to be somewhat soft for this step. Just spoon it into the pots, working it around the straw, until it almost reaches the very tip top of the straw. Clean up the top edges of the pot with a damp paper towel. Now return the pots to the freezer until firm.

In a food processor pulse the Oreo cookies until they resemble nice, rich topsoil. (Or crush them in a Ziploc bag with a rolling pin). When they are nice and firm, take the pots out of the freezer and spoon the dirt (crushed Oreos) over the top. Be generous here! Place a flower into the straw and then cover the straw with a bit more dirt.

For step-by-step directions with pictures, check out The Pioneer Woman's recipe.

Tuesday, August 14, 2012

Monday Munchies - Veggie Wrap

The last couple of weeks have been CRAZY around here.  My laptop died...two days after I had transferred all of my food photos off of my memory card, which is why there was no post last week.  This week has been full of adventures like falling asleep in the mountains watching a meteor shower, and being face to face with a mama grizzly (well, maybe not quite, but 50 ft. away feels VERY close).  But more on that later, lets get to the food!

Since life has been busy I have found myself eating peanut butter and jelly/honey/banana sandwiches almost everyday for lunch.  And although I never get tired of peanut butter, this wrap makes lunch a little classier.


Veggie Wrap
1 Tortilla
2-3 T. Hummus
1/2 c. Couscous
Veggies of your choice (I used red peppers, onions, tomatoes and spinach)
Cheese (I used mozzarella because that's what we had in fridge)

Spread hummus all over the inside of the tortilla, then top with couscous, veggies and cheese. Roll and eat!

Monday, July 30, 2012

Monday Munchies - Southwest Chicken Chop Salad

Pre-mixage.
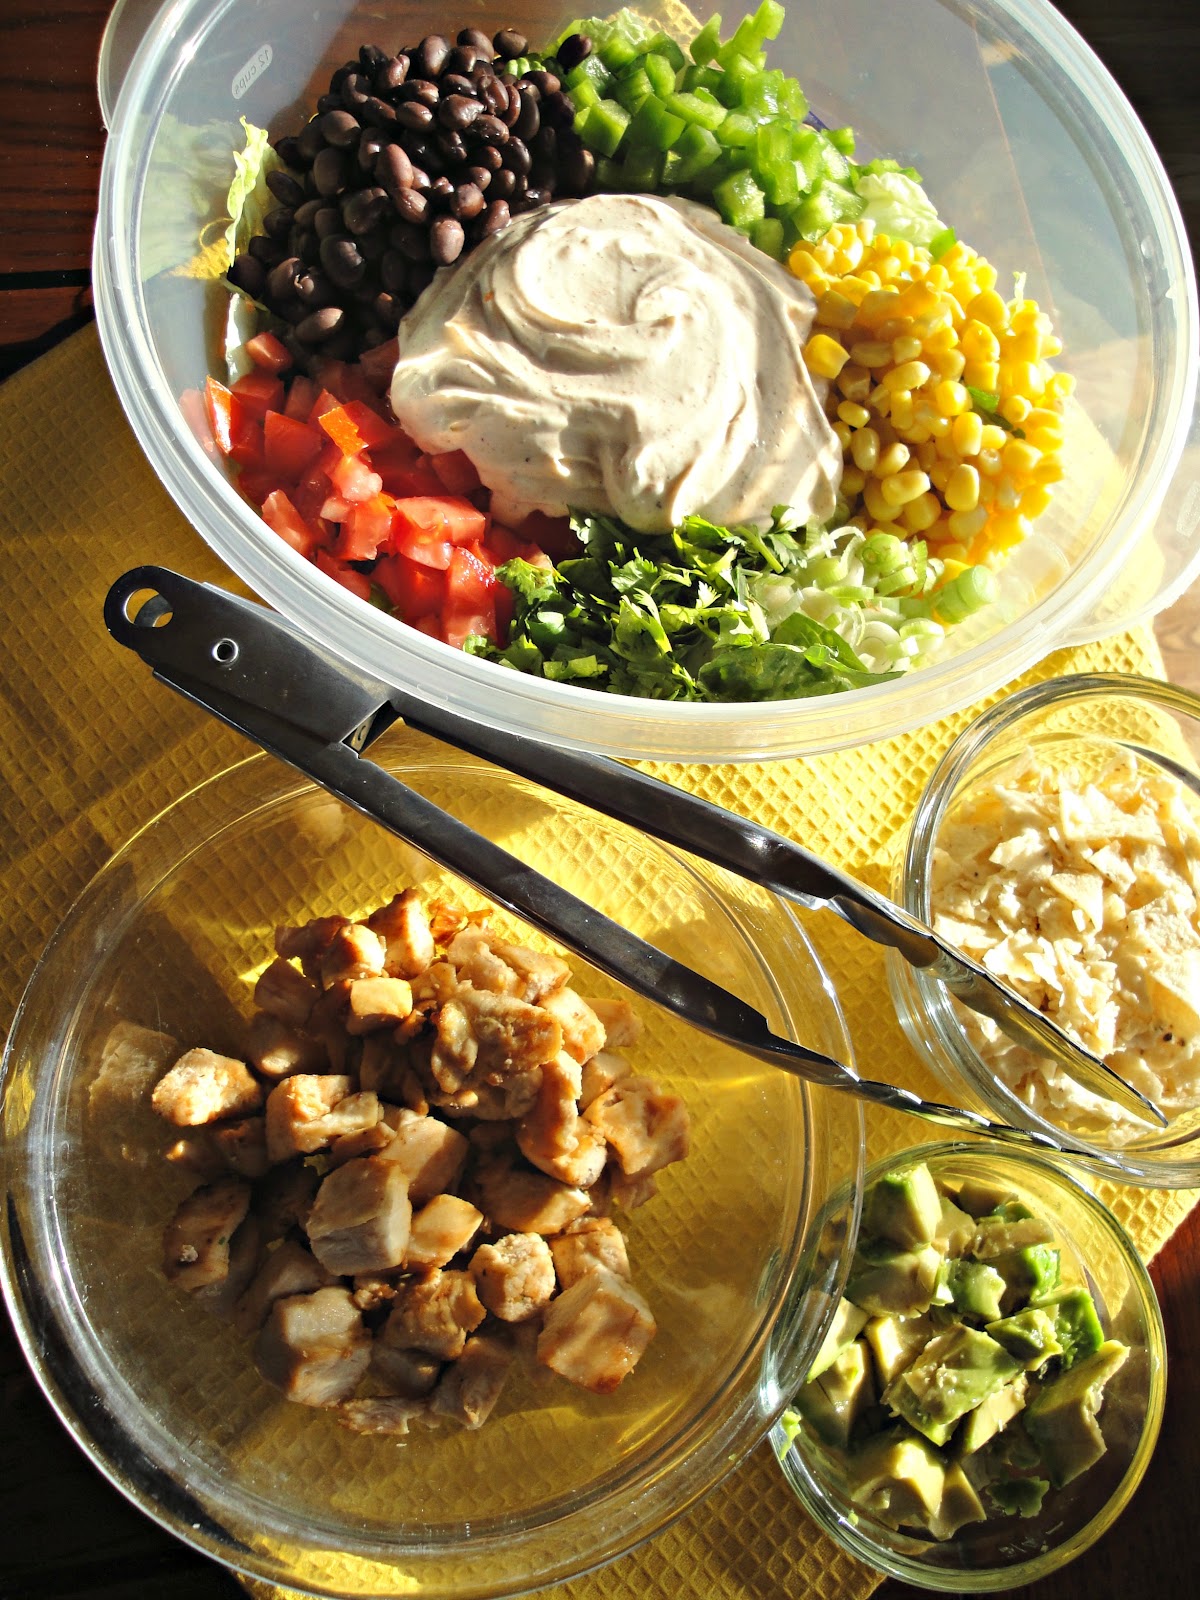
After seeing this recipe all over Pinterest, I finally made it for dinner last week.  You should probably know that my favorite salad ever is a the Barbecue Chopped Salad with tri tip from Stonefire Grill in California, (this may shock you but I actually miss it more than In-N-Out).  I've tried to recreate the Stonefire salad many times, and have come pretty darn close, but it's just not quite the same. This Southwest Chicken Chop Salad has a lot of similar ingredients, but it's different enough that I knew I wouldn't go into it expecting it to taste like my favorite salad.  It was a good and simple recipe to throw together for a quick weeknight meal.  If you aren't planning on having some leftovers, I would add the dressing either to half or each individual portion so the salad doesn't get all wilted and soggy.  Same story with the avocados and tortilla chips, just add them to each portion so they keep their appropriate textures.

Southwest Chicken Chop Salad 
2 cups diced rotisserie chicken (I didn't have any so I just cut some chicken into chunks and cooked it in the skillet)
1 green pepper, diced
1 cup black beans
1 cup sweet yellow corn {canned or frozen and defrosted}
2 roma tomatoes, diced (I used Wyomatoes from the farmer's market - yeah, they're pretty awesome!)
4 scallions, washed and sliced {white and green parts}
1 large romaine heart, washed and chopped
1/2 bunch cilantro, washed and chopped
2 just under ripe avocados, diced
2 cups crushed tortilla chips
for the dressing-
1/2 cup mayonnaise
1/2 cup sour cream
1/2 tablespoon ranch seasoning
1/2 tablespoon taco seasoning
1/2 tablespoon lime juice {optional}
salt & pepper, to taste

Directions:
In a large bowl, stir all salad ingredients together, excluding the tortilla chips and avocado. In a small bowl, stir all dressing ingredients together until smooth. When ready to serve, toss salad with dressing then gently stir in avocado and tortilla chips.
Post-mixage - except for the avocados and tortilla chips!

Tuesday, July 24, 2012

Monday Munchies - Inside-Out Burgers


So, my sources tell me that life in Missouri is HOT.  In the same day I found out a friend was in the hospital for dehydration and another friend passed out from the heat, and that was one of the cooler days!  That being said, my MO readers probably aren't going to be too interested in firing up the grill anytime soon, but once it cools off you have to try these burgers.  They are unique in that all the stuff you would usually put on top of the burger goes inside, it makes them extra moist and is a nice surprise when you bite into it.  Because these burgers are stuffed (therefore extra thick) it does take a bit longer for them to be cooked through, just keep that in mind!

Inside-Out Burgers
1.5 lbs. ground beef
2 T. ranch dressing
Salt & Pepper
Knead the above ingredients together and then form into 10 VERY THIN patties.  

On 5 of those patties top with:
1 T. Ranch dressing
1/2 slice crisply fried bacon (crumbled)
1/2 slice cheese (generally we use cheddar but smoked gouda is my favorite splurge on these)
I also added some green onions the last time I made these, and will probably do it again!

Then, place the plain patties on top of the topped patties and seal around the edges.  Grill and enjoy!

Recipe Source: Kathy Cordero

Update: Sorry this didn't get posted yesterday, I scheduled it but then saved it instead of publishing, my bad!


Monday, July 16, 2012

Monday Munchies - Citrus Ice Cream


As you may already know, July is National Ice Cream Month and yesterday was National Ice Cream Day (declared by Ronald Reagan, just one more reason to love the guy)!  I celebrated with a bowl of some homemade Apple Pie Ice Cream that I made on Saturday.  It has a french vanilla base with chunks of caramelized apples and bits of graham cracker, so good and actually tasted just like apple pie!

Although I loved the apple pie flavor, my absolute, hands down, favorite flavor of homemade ice cream is this citrus recipe.  Rich and creamy with banana, orange and lemon flavors, it is SO refreshing on a hot summer day!  Actually, it's good on winter days too.  I requested it for my birthday dessert (in February...unfortunately the idea got shot down). The 4th of July is usually the occasion this ice cream is most likely to show up for, but since I wasn't planning to be home for the 4th (turned out I was) and because I didn't get it for my birthday, my parents made some for me the week before I moved!

We actually have a really funny story about this ice cream too.  My mom always mixes up the base of the ice cream, and then it's my dad's job to churn it and add ice/salt as necessary.  One year the ladies had mixed up the base, and my dad and Steve Burton (the friends from Cali in this post) were churning away.  The ice cream maker is supposed to stop when the ice cream gets thick and properly frozen, but this time it just kept going and going and going, but never freezing.  Turns out (after a couple of hours haha), they forgot to put the paddle in the ice cream maker...oops!  So...if you make this ice cream, make sure your ice cream maker is properly assembled!

Citrus Ice Cream
(This yields about 4 quarts - cut in half if using a small ice cream freezer)
3 c. Milk
3 c. Whipping Cream
3 c. Sugar
3 medium bananas (mashed)
1 c. Freshly squeezed lemon juice (6 or 8 large - the amount of fruit it takes to make the juice varies a lot, these are just estimates, use more or less as needed)
1 c. Freshly squeezed orange juice (5 or 6 large)

Combine milk, cream and sugar in a large bowl and stir until sugar is dissolved. (It's best at this point to put it in the chilled can, and then let chill in the refrigerator until cool)  Transfer to ice cream maker and freeze partially. Blend in bananas and fruit juices and continue freezing until firm. And, my mom adds: "If it takes hours, you have probably forgotten the paddle! "