Showing posts with label Main Dish. Show all posts

Monday, November 18, 2013

Monday Munchies - Accidental Turkey

So today, I'm giving you a recipe for the hero of the thanksgiving dinner menu - Mr. Turkey!  Now, I have a confession to make...I've actually never made this recipe.  However, before you quit reading, my roommate made it for a summer thanksgiving meal (cause one thanksgiving a year really isn't enough), and it was some of the best turkey I had ever eaten.  Roasting it at such a high temperature for an hour makes the skin nice and crispy, which I love!  And the spice blend is absolutely delicious, the lemon zest and rosemary just make it!  So, if you're looking for something new to adorn your thanksgiving table this year, give this turkey recipe a try!


Accidental Turkey
Kosher salt
1 T. minced fresh rosemary leaves
Grated  zest of 1 lemon
1 (12-14 pound) fresh turkey
1 large yellow onion, unpeeled and cut into eighths
1 lemon, quartered
8 sprigs fresh thyme
4 T (1/2 stick) unsalted butter, melted
Freshly ground black pepper

Directions:
Two or three days before you plan to roast the turkey, combine 3 tablespoons salt, the rosemary, and lemon zest.  Wash the turkey inside and out, drain it well, and pat it dry with paper towels.  Sprinkle 1 T of the salt mixture in the cavity of the turkey and rub the rest on the skin, including under the wings and legs.  Place the turkey in a shallow dish to catch any drips and wrap the whole dish tightly with plastic wrap.  Refrigerate for one or two days.  The day before you plan to roast the turkey, remove the plastic wrap and leave it in the fridge.  The skin will dry out and turn a little translucent.

Preheat the oven to 450 degrees.  Be sure your oven is very clean!

Place the onion, lemon, and thyme in the cavity.  Tie the legs together with kitchen string and tie the wings close to the body.  Brush the turkey with the butter and sprinkle it with salt and pepper.

Roast the turkey for 45 minutes, placing it in the oven legs first.  Lower the temperature to 325 degrees and roast it for about another hour, or until 165 degrees for the breast and 180 degrees in the thigh on an instant read thermometer.  Remove from the oven, cover the turkey tightly with aluminum foil, and allow it to rest for 20 to 30 minutes.  Carve and serve with the pan juices.

Recipe Source: Barefoot Contessa Foolproof Recipes You Can Trust

Tuesday, September 25, 2012

Monday Munchies - Southwestern Quinoa with Veggies and Mango

After getting back from Colorado Springs at 2:00 AM yesterday morning, with a full day of work and church ahead, I decided Monday Munchies was going to wait to make it's appearance until Tuesday.  We had a great road trip and the fall colors were at their peak which made the scenic routes that we took even more beautiful.  I'm resisting the urge to post fall recipes until October, but I'll share a couple of pictures from our trip with you to get you in the mood!
Just outside of town
Steamboat Springs
About an hour outside of Estes Park
But while summer veggies are still readily available, take advantage of it and make this recipe for a yummy and healthy salad or main course.  I actually have a confession to make about this recipe...I didn't measure out my lime juice and the first day it was REALLY limey tasting.  Like, pucker you up almost inedible (is that a word?).  However, I decided to squirt a tablespoon or so of ranch dressing on it, which masked the lime juice just as I hoped, and gave it kind of a nice creamy texture. If you wanted something simpler I think this would also be good to swap the dressing from this recipe with southwestern ranch for a creamier salad.


Southwestern Quinoa with Veggies and Mango
1 c. quinoa, rinsed and drained
1 t. ground cumin
1 c. frozen or canned corn (drained)
1 c. black beans
1 tomato, diced
1 small zucchini, chopped
1 small cucumber, chopped
1 small red bell pepper, chopped
1/4 c. red onion, diced
1 small mango, chopped
1 small jalapeno pepper, deseeded and finely diced
1/2 c. chopped fresh cilantro
1/3 c. lime juice
1/3 c. olive oil
2 garlic cloves, minced
1/2 t. ground cumin
1/2 t. chili powder
1/4 t. ground turmeric

Directions:
In a saucepan, bring 2 cups water to a boil; add quinoa and cumin. Cover, reduce heat to medium-low and simmer until liquid is absorbed, about 12 minutes. Remove pan from heat and let stand for 5 minutes. Uncover, fluff with a fork and let cool for at least 10 minutes.

Mix together quinoa, corn, beans, tomato, zucchini, cucumber, bell pepper, onion, mango, jalapeno, and cilantro in a large bowl.

Whisk together lime juice, olive oil, garlic, cumin, chili powder and turmeric in a small bowl.  Drizzle over quinoa mixture and toss to coat.  Refrigerate for at least 1 hour.

Monday, July 30, 2012

Monday Munchies - Southwest Chicken Chop Salad

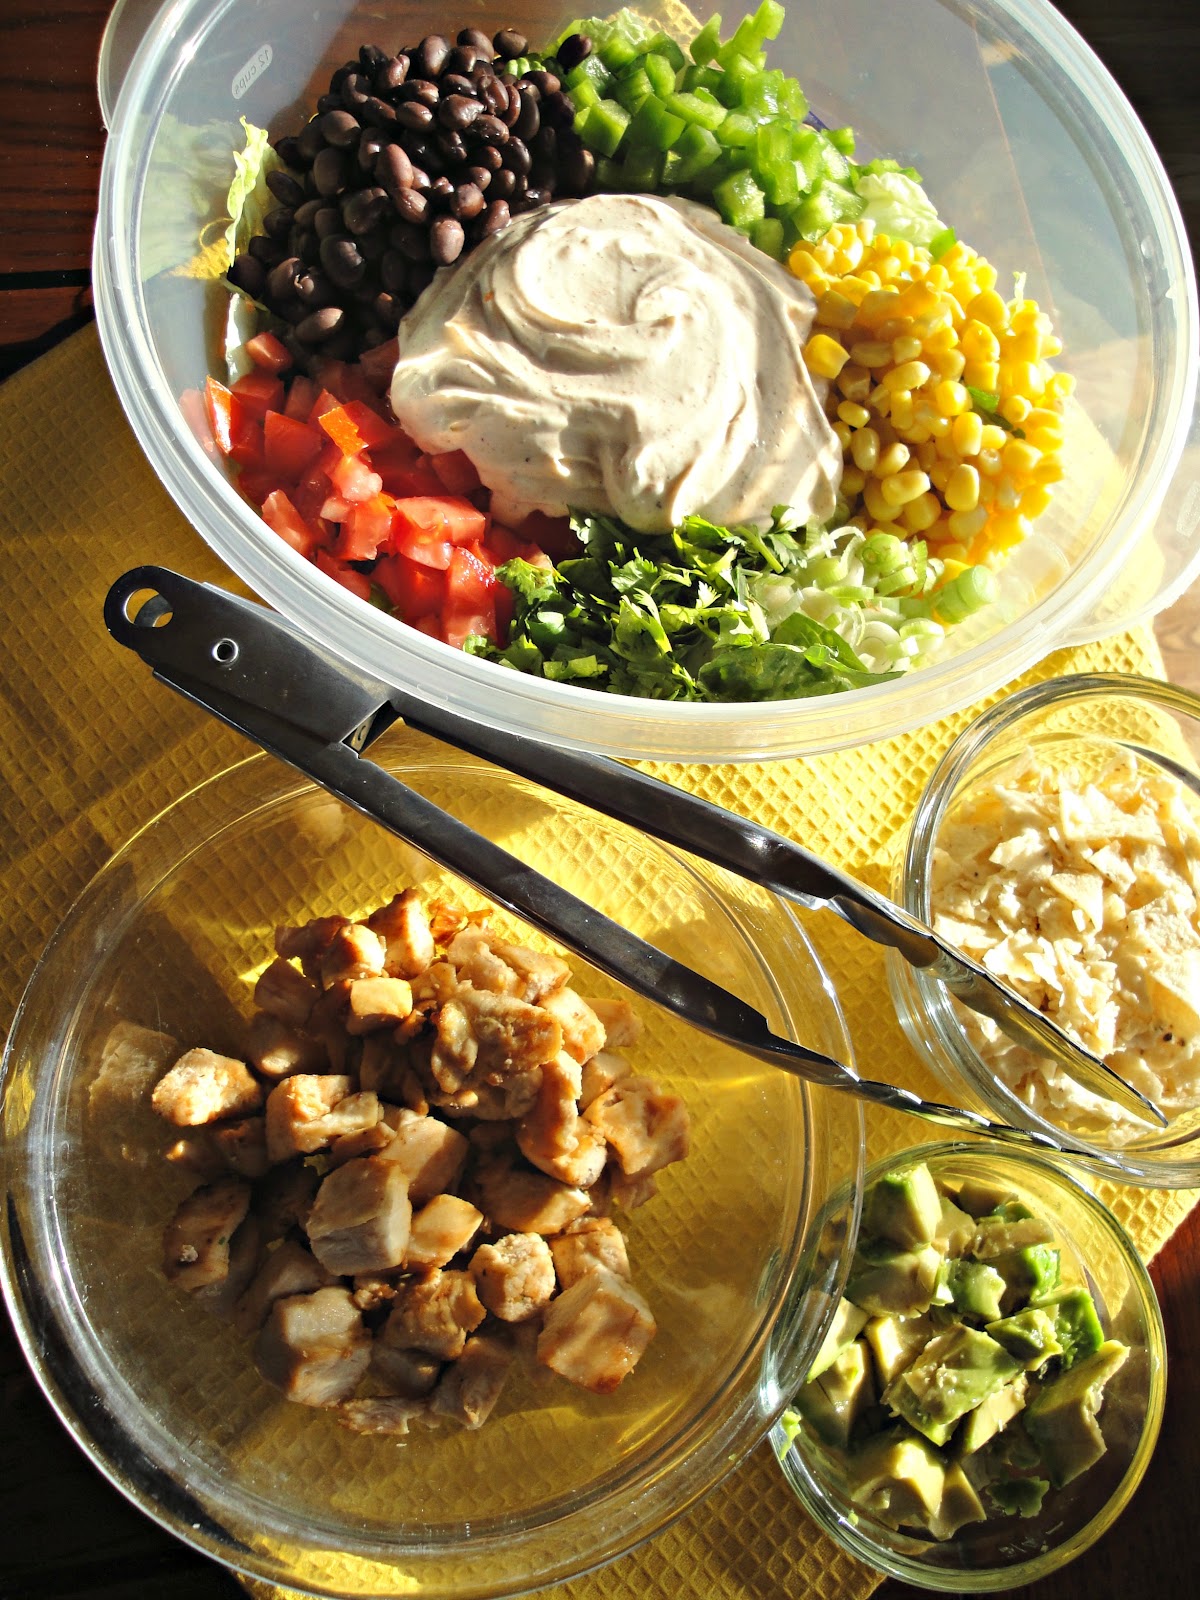
Pre-mixage.
After seeing this recipe all over Pinterest, I finally made it for dinner last week.  You should probably know that my favorite salad ever is a the Barbecue Chopped Salad with tri tip from Stonefire Grill in California, (this may shock you but I actually miss it more than In-N-Out).  I've tried to recreate the Stonefire salad many times, and have come pretty darn close, but it's just not quite the same. This Southwest Chicken Chop Salad has a lot of similar ingredients, but it's different enough that I knew I wouldn't go into it expecting it to taste like my favorite salad.  It was a good and simple recipe to throw together for a quick weeknight meal.  If you aren't planning on having some leftovers, I would add the dressing either to half or each individual portion so the salad doesn't get all wilted and soggy.  Same story with the avocados and tortilla chips, just add them to each portion so they keep their appropriate textures.

Southwest Chicken Chop Salad 
2 cups diced rotisserie chicken (I didn't have any so I just cut some chicken into chunks and cooked it in the skillet)
1 green pepper, diced
1 cup black beans
1 cup sweet yellow corn {canned or frozen and defrosted}
2 roma tomatoes, diced (I used Wyomatoes from the farmer's market - yeah, they're pretty awesome!)
4 scallions, washed and sliced {white and green parts}
1 large romaine heart, washed and chopped
1/2 bunch cilantro, washed and chopped
2 just under ripe avocados, diced
2 cups crushed tortilla chips
for the dressing-
1/2 cup mayonnaise
1/2 cup sour cream
1/2 tablespoon ranch seasoning
1/2 tablespoon taco seasoning
1/2 tablespoon lime juice {optional}
salt & pepper, to taste

Directions:
In a large bowl, stir all salad ingredients together, excluding the tortilla chips and avocado. In a small bowl, stir all dressing ingredients together until smooth. When ready to serve, toss salad with dressing then gently stir in avocado and tortilla chips.
Post-mixage - except for the avocados and tortilla chips!

Tuesday, July 24, 2012

Monday Munchies - Inside-Out Burgers


So, my sources tell me that life in Missouri is HOT.  In the same day I found out a friend was in the hospital for dehydration and another friend passed out from the heat, and that was one of the cooler days!  That being said, my MO readers probably aren't going to be too interested in firing up the grill anytime soon, but once it cools off you have to try these burgers.  They are unique in that all the stuff you would usually put on top of the burger goes inside, it makes them extra moist and is a nice surprise when you bite into it.  Because these burgers are stuffed (therefore extra thick) it does take a bit longer for them to be cooked through, just keep that in mind!

Inside-Out Burgers
1.5 lbs. ground beef
2 T. ranch dressing
Salt & Pepper
Knead the above ingredients together and then form into 10 VERY THIN patties.  

On 5 of those patties top with:
1 T. Ranch dressing
1/2 slice crisply fried bacon (crumbled)
1/2 slice cheese (generally we use cheddar but smoked gouda is my favorite splurge on these)
I also added some green onions the last time I made these, and will probably do it again!

Then, place the plain patties on top of the topped patties and seal around the edges.  Grill and enjoy!

Recipe Source: Kathy Cordero

Update: Sorry this didn't get posted yesterday, I scheduled it but then saved it instead of publishing, my bad!


Monday, July 9, 2012

Monday Munchies - Quick Crock Pot BBQ Chicken

First off, I'd like to ask you to pray for my co-worker Phil and his family.  His wife, Brandi, was in a bad car accident over the weekend and is still in a coma.  Pray for Brandi's healing, for peace and comfort for Phil and his family, and that God would use this situation to bring Himself glory.  Also, if you guys have any good suggestions of items to go in a care package for Phil while he spends his days in the hospital, I'd love to hear them!  All of my other co-workers are men, so I'm not getting many ideas!

Now, on to cooking!  This recipe is so easy I hesitate to even put it on my blog.  But I figure you need simple recipes too.  In the summer I'm always looking for recipes that don't heat up the house.  For those of you in parts of the country that are experiencing scorching heat right now, this recipe is for you!   There's no turning the oven on and heating up the house, almost no prep, leave it cooking while you go swim and cool down and then come home to enjoy an easy dinner!


Quick Crock Pot BBQ Chicken
2 chicken breasts, halved
1 cup(ish) BBQ sauce (I used Sweet Baby Ray's for this but you could make your own too!)

Put the chicken breasts in the crock pot.  Pour the BBQ sauce over the chicken and then turn them so that both sides are coated.  Turn crock pot on low and let simmer for 2-3 hours.  Take chicken out, shred and add back into the crock pot, stirring the excess BBQ sauce into the shredded meat.  Add extra sauce if it seems too dry.  Let simmer in the crock pot another 30 minutes, and it's ready to serve!

Traditionally you would probably just throw it on a bun, but I added some cheese, red onion and some extra sauce and made it into a quesadilla.  Next time I think I'll add some pineapple chunks to the quesadilla, and pepper jack cheese would be great in it too!  I'm also anxious to try making some BBQ chicken nachos using this meat.  What ideas can you come up to use your shredded BBQ chicken?   


Source: Endless Frontier Original - although I'm not sure how original dumping BBQ sauce on chicken can be!

Monday, June 18, 2012

Monday Munchies - Hawaiian Chicken Marinade

I tried grilling alone for the first time ever last week.  It was a little scary, but for being a newbie I think it turned out pretty good!  This marinade is one of my favorites, so I figured if I used the marinade whatever I grilled should at least be edible!  I had some chicken breasts in the freezer so I thawed those out, but I've also made this recipe with pork chops, and it's delicious as well.

Hawaiian Chicken Marinade 
4 boneless chicken breasts
1 cup soy sauce
1/2 cup brown sugar
2 cloves garlic, chopped
1 teaspoon vinegar
1/4 teaspoon cayenne pepper
juice of 1 lime
1/2 teaspoon ground ginger

Place the chicken in a large ziploc bag. Whisk together the soy sauce, garlic, vinegar, cayenne, lime juice and ground ginger and pour into the ziploc bag with the chicken. Seal the bag and place in the refrigerator for at least 3 hours.  This is super tasty with a fruit salsa on it too, we served these with peach salsa from Sam's Club for a party my brother had last year, it was a great addition, or some grilled pineapple is always good too!

Monday, May 7, 2012

Monday Munchies - Quick Eggplant Parmesan


This week's recipe is another meatless main dish - don't worry, the Jackson hippies haven't gotten to me yet, although there are a bunch of cute hippie skirts for sale around town, and I think it's only a matter of time until one of those makes its way into my closet!  Eggplant Parmesan is a great weeknight meal, quick and easy, but tastes like you spent a lot more time on it.  Also, with the exception of eggplant, all of the ingredients are things that I keep in the pantry so it doesn't require a lot of extra thought or planning.  I like eating these as patties, but they would be a good pasta topper as well!

Quick Eggplant Parmesan
Serves: 2
1 egg
1 T. water
1 small eggplant cut into 3/4" thick slices
1 c. dried bread crumbs, seasoned (I would probably start with 2/3 or 3/4 cup next time, I had quite a bit leftover that I had to throw away, and if you start with less you can always add more if needed)
1 and 1/2 c. shredded mozzarella

1/4 c. spaghetti sauce
1/4 t. crushed red pepper flakes
3 T. grated Parmesan cheese

In a small bowl beat the egg and water together.  Place the bread crumbs in a shallow dish.  Dip the eggplant slices in the egg mixture and then in the bread crumbs, being sure to coat thoroughly.

Heat oil in a large skillet over medium-high heat until hot.  Add eggplant slices and reduce heat to medium.  Cook for 3-4 minutes per side or until golden brown and tender.  Sprinkle mozzarella cheese over eggplant during the last minute of cooking to melt.

While eggplant is cooking, combine spaghetti sauce and pepper flakes in a microwave safe measuring cup.  Cover with plastic wrap and cook at high power for 2 minutes or until heated through.

Top eggplant with sauce and Parmesan cheese to serve.

Source: My mom's recipe box - other than that I have no clue!

Monday, April 23, 2012

Monday Munchies - Fiesta Chicken Salad


The last couple of days here in Jackson have been absolutely beautiful!  I spent quite a bit of time outside, and all of the warm weather made me hungry for one of my favorite summer salads, Fiesta Chicken Salad!  I love the marinated chicken/veggie mixture, and my roommate agrees that it's better the second day because all the flavors have more time to blend together, either way, YUM!  Last night we ate it as a salad, but tonight we ate it in whole wheat tortilla shells and it was great that way as well.  I'll admit, I used to just eat the chicken/veggie mixture (no lettuce) on chips, I'm pretty sure you can't go wrong with any combination of these ingredients!

P.S. Sorry I only have one picture, my camera charger tried to escape the move.  Thanks to my mom and the mailman it will be back shortly!

Fiesta Chicken Salad
Chicken mixture:
2 chicken breasts cut into bite sized pieces
1/2 t. garlic salt
Olive oil

Saute chicken until done

Veggie mixture:
1 (16 oz) package frozen corn
1 red pepper (diced)
3 avocados (diced)
1 can black beans (drained)
1-2 tomatoes (diced)
Chopped green onions

Put the above ingredients in a large bowl, mix in the chicken, and pour dressing over all a few hours before serving (in my opinion, the longer the better, however if you want your avocados to stay looking good, add them just before serving).

Dressing:
1/8 t. pepper
1/4 c. vinegar
3 T. honey
1 and 1/2 t. ground cumin
1/4 t. salt

To Serve:
On a plate, break up tortilla chips.  Place torn lettuce on the chips, followed by the chicken and veggie mixture.  Top with cheddar cheese, sour cream, and salsa (and I think it would be might tasty with some cilantro and sliced olives on top as well).

Source: Carrie Robson

Monday, April 2, 2012

Monday Munchies - Healthy Horseradish Hamburgers


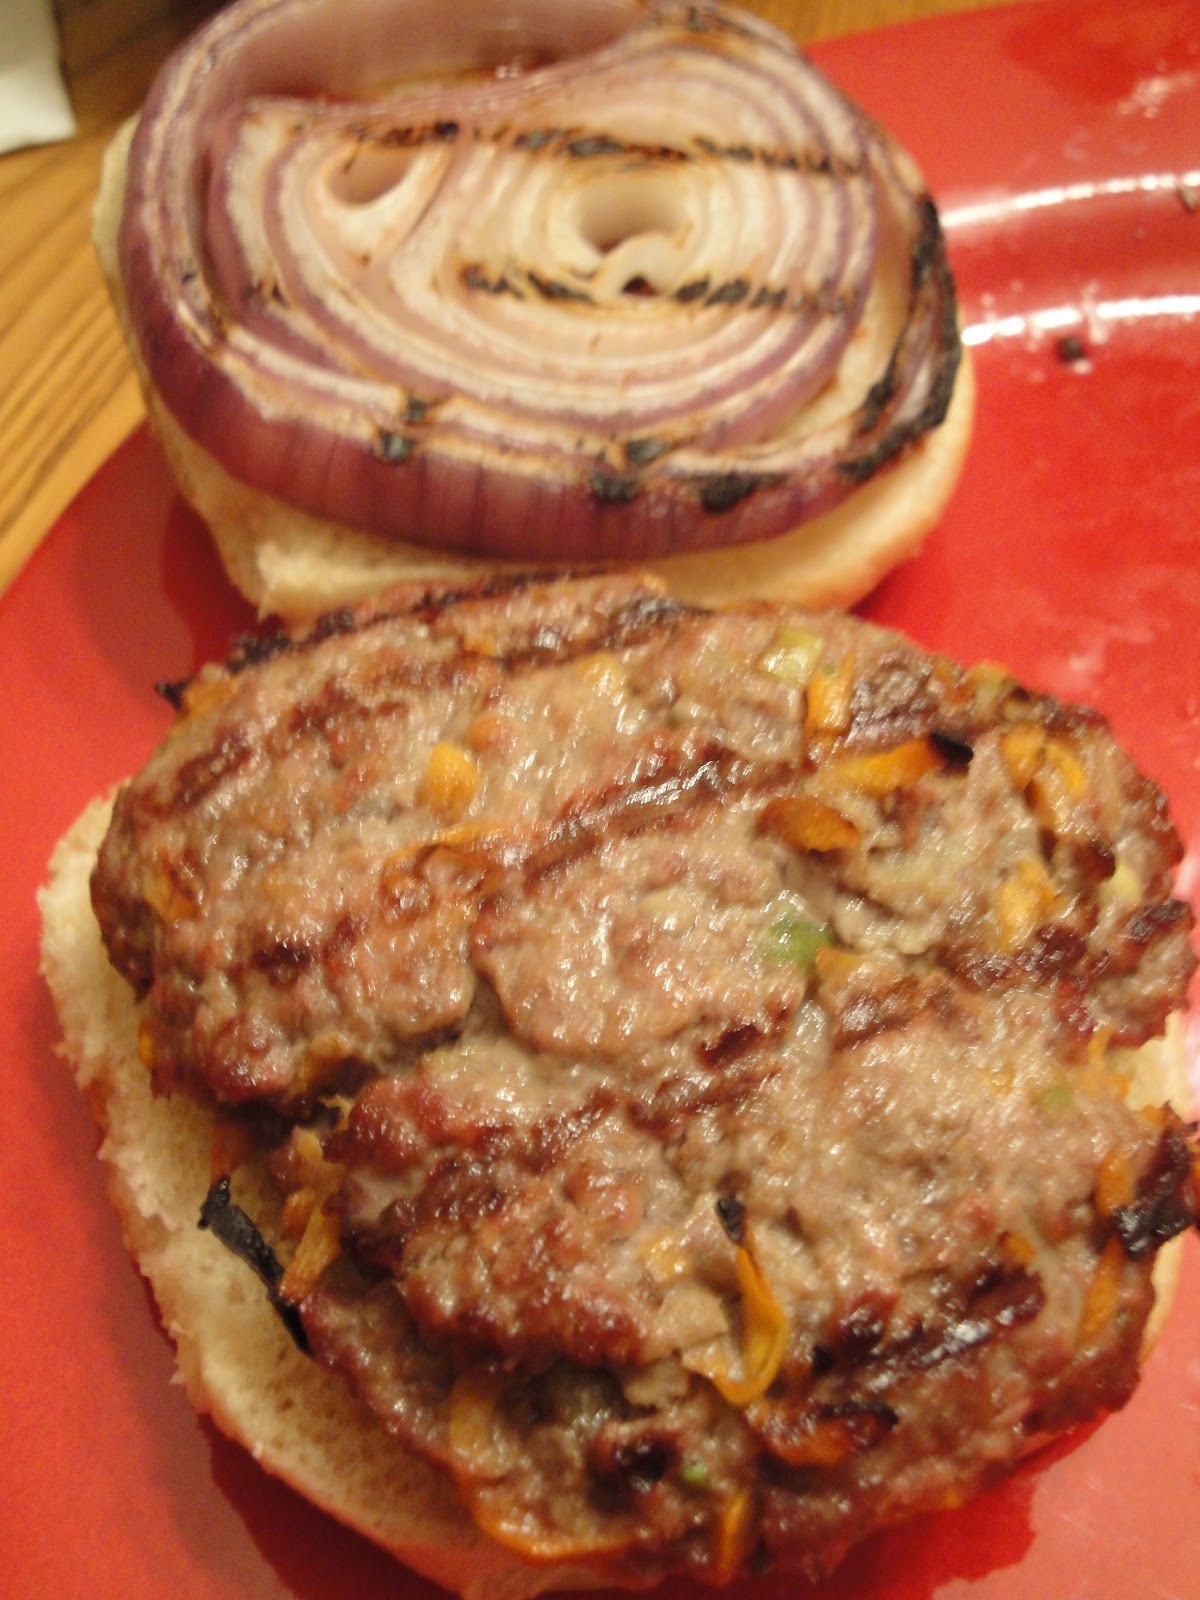
Grilling season is definitely here! Last week our neighbors to the right and left and behind us were all grilling making the neighborhood smell WONDERFUL!!!  As summer approaches and we enjoy the warmer weather, blooming trees, and everything great that comes with spring, we also know that the ever dreaded bathing suit season is right around the corner as well.  This is a great recipe in which fewer calories does not mean less flavor, in fact, I prefer these over a regular ground beef burger.  I'm not a huge fan of horseradish, I don't like the way it overpowers other flavors, but in these burgers it adds just the right amount of flavor and kick without being too spicy!  These burgers are also great all year long, whether you cook them on the grill or in a skillet.

Horseradish Hamburgers
1 lb. lean ground beef
2 scallions, finely chopped
1/4 c. finely shredded carrot
1 T. prepared horseradish
1/2 t. salt

Directions:
Stir the beef, scallions, carrot, horseradish and salt together in a medium bowl until well mixed.  Form into 4-6 patties.  Note:  They are a bit more crumbly than regular burgers, but just keep squishing them together, they stick enough that transferring/grilling/eating them is not a problem!

Spray a non-stick rigid grill pan w/non-stick cooking spray and set over medium high heat.  Add the patties and cook until an instant read thermometer inserted into the side of a burger registers 160 degrees (for a well done burger - about 4-5 minutes per side).  Or, throw them on a grill instead!  Also, grill your onions...trust me, just do it.

If you make 6 burgers, each burger has 205 calories and 5 weight watchers points (not sure about points plus)

Source: Weight Watchers Comfort Classics Cookbook

Also, head over to Ali's blog Gimme Some Oven for a chance to win a $100 Visa giftcard, and check out her great recipes while you're there!

Monday, March 5, 2012

Monday Munchies - Quiche and Pie Crust

The last couple of weeks have been CRAZY here at the Hoffman household which is why Monday Munchies (and the blog in general) has been completely neglected.  The short version of the story is that I'm still trying to move, but two weeks ago my brother came back from DC for the weekend, found out Feb. 20 that he would be relocating to Jeff City for the summer and starting his new job on March 1.  I flew out on the 25th to help him pack up his stuff, then we drove 940 miles and arrived in Jeff City on the leap day (thank goodness for that extra day this month!) went apartment shopping for two days and got back home on the March 1!


So, that's what I've been doing the last two weeks, and because I've been behind, you're getting a two-for-one today - pie crust and quiche!  The quiche is delicious and really you can put anything you want in it.  Use whatever cheese you want, throw in some broccoli or spinach, use sausage instead of bacon, or don't use meat at all - make it your own, you pretty much can't go wrong!


Pie crust used to intimidate me.  I'd made pies a few times, but the crust never turned out well.  I'm not very patient with kitchen blunders, and I don't even like pie crust, so it seemed easier just to buy a crust (or even better, let my mom make it)!  However, before thanksgiving this year I decided I wasn't going to let crust get the best of me, I would work at it until I could make a tender, flaky and tasty crust consistently, maybe not perfect, but at least acceptable to serve to non-family!  Once I realized that my main mistake was following the recipe exactly (Mrs. Taylor, my food science prof. is probably somewhere crying right now) instead of going by texture, every pie crust has turned out great!


Pie Crust (yield: 2 crusts) 
3 c. flour
1 t. salt
1 c. Crisco
1 egg (beaten)
2 T. vinegar
5 T. COLD water (A key part of the crust is making sure the water is cold enough, so the first step I do in this recipe is to put two ice cubes in a cup of water, and put it in the fridge while I'm mixing the other ingredients.  This ensures that your water is good to go by the time you're ready to use it!) 


Sift flour and salt, cut in shortening.  Combine beaten egg and vinegar and add to flour mixture.  Add enough water to moisten. (This is where I had gone wrong in the past.  The recipe called for 5 T. so I put in 5 T.  For whatever reason, you need different amounts of water each time you make a crust.  Sometimes you need 3 T., sometimes you need 7 T.  I haven't figured out why there can be such a big difference, but the size of the egg has something to do with it.  Add enough water so that as you work it into a dough ball, the majority of the dough sticks together and the crumbs left at the bottom can be worked in with a little effort.  If you have a bunch of dry crumbles at the bottom add some more water directly to that spot.  Basically add just enough water that the dough sticks together and not so much that it is as moist as cookie dough or other dough similar to that.)


Pie Rolling 101: Make sure you are generous with your use of flour as you're rolling out the dough.  Flour the pastry board and the the top of the dough ball, roll a couple of times to flatten, then pick the dough up, spread more flour on the board, and flip the dough over.  Continue rolling until flattened to the correct size.  Roll the dough over the rolling pin to transfer to the pie plate, and before you know it, you have a practically perfect pie crust in front of you!


Quiche Lorraine
1 unbaked pie shell
6 slices bacon
1/2 c. diced onion
1/2 lb (2 c.) shredded cheese
1.5 c. frozen peas
4 eggs (beaten)
1 c. milk
1 c. cream (I just use all milk and omit the cream)
1 t. salt
1/8 t. pepper
1/4 t. nutmeg


Heat oven to 450.  Cover inside of pie shell (which should have holes poked in it with a fork) with waxed paper then fill with dry rice or beans.  Bake 10 min.  Remove beans and waxed paper and cool.


Fry bacon till crisp.  Drain and crumble.  Cook onion in 1 T bacon fat just until transparent.  Put shredded cheese, bacon and and onion in the pie shell.


Combine eggs, milk, cream, salt, pepper, and nutmeg and pour into pie shell. (Tip from my mom: If you microwave the egg mixture at 1 min. intervals until the mixture is warm but not scrambling the egg it cuts down on the cooking time).  Bake 15 min. at 450 then reduce the temperature to 350 and bake 10-15 min. more (this was more like 20 min for me, even with microwaving the egg) or until thin metal blade inserted into the middle of the quiche comes out clean.  Let stand 10-15 minutes before cutting.